



Class Component 是什麼? Class Component(類別元件)是用 JavaScript 的 class 語法定義的 React 元件:繼承 React 內建的 Component,並實作一個 render() 方法回傳 JSX。第一次遇到多半是在舊專案或舊教學裡,看到 this.state、this.setState、componentDidMount 這些名稱,卻發現新教學全都寫函式。本文說明類別元件的基本寫法、生命週期方法各在什麼時候執行、跟函式元件怎麼一一對照,以及目前哪些情況還是只能用類別。
JSX 本身的規則可前往〈JSX 是什麼?React JSX 語法規則、與 HTML 的差異和轉譯原理〉觀看,本文不重講,只談元件的寫法。
Class Component 是什麼:用 class 定義的元件
React 官方文件對 Component 的描述是:它是以 JavaScript 類別定義的 React 元件的基底類別,要定義類別元件,就繼承內建的 Component 並定義 render 方法。官方同時說明,類別元件仍然受 React 支援,但不建議用在新程式碼,官方建議把元件定義成函式。Component 在文件裡被歸在 Legacy React APIs 底下,這一組 API 仍從 react 套件匯出,但不建議用於新寫的程式碼。
最小的類別元件長這樣:
import { Component } from 'react';

class Greeting extends Component {
  render() {
    return <h1>Hello, {this.props.name}!</h1>;
  }
}
傳進來的 props 從 this.props 讀取,官方註明這等同於函式元件宣告 props。使用方式和函式元件相同,都是 <Greeting name="Taylor" />。
類別元件的 state:this.state 與 setState
類別元件的 state 放在 this.state,官方規定它必須是物件,也不可以直接修改,要改就呼叫 setState:
class Counter extends Component {
  state = { age: 42 };

  handleAgeChange = () => {
    this.setState({ age: this.state.age + 1 });
  };

  render() {
    return (
      <>
        <button onClick={this.handleAgeChange}>Increment age</button>
        <p>You are {this.state.age}.</p>
      </>
    );
  }
}
幾個容易搞混的地方:
setState是「請求」:官方說明要把它想成請求更新元件,而不是立即執行的命令,呼叫之後this.state不會馬上變。- 只有
constructor可以直接指定this.state;其他方法一律用setState,而且不要在constructor裡呼叫setState。 - 舊寫法會在
constructor裡宣告 state,並用this.handleClick = this.handleClick.bind(this)綁定方法。官方說明constructor通常只用在這兩件事,而用現代語法(public class field)就能改寫成上面範例的state = {...}與箭頭函式,所以constructor很少需要了。 constructor裡不該放副作用或訂閱。
官方也註明:在類別中定義 state,等同於在函式元件呼叫 useState。
生命週期方法:mount、update、unmount
React 元件從加入畫面到移除,會經過三個階段,類別元件用同名方法掛進這三個時間點:
| 方法 | 執行時機(依官方說明) | 常見用途 |
|---|---|---|
componentDidMount | 元件加入畫面(mount)時 | 開始資料請求、建立訂閱、操作 DOM 節點 |
componentDidUpdate | 因新的 props 或 state 重新渲染後立刻呼叫,初次渲染不會呼叫 | 更新後操作 DOM;比較新舊 props 之後才發請求 |
componentWillUnmount | 元件從畫面移除(unmount)前 | 取消資料請求、移除訂閱 |
官方特別提醒:componentWillUnmount 的邏輯應該要「對應」componentDidMount,在掛載時建立的東西,在卸載時要收掉。
下面這段程式碼把同一個計數器分別寫成類別元件與函式元件,並在每個生命週期印出 log。函式元件用 useEffect 加上清除函式,依賴陣列放 count:
class CounterClass extends Component {
  state = { count: 0 };

  componentDidMount() {
    log('[class] componentDidMount');
  }

  componentDidUpdate(prevProps, prevState) {
    log('[class] componentDidUpdate: ' + prevState.count + ' -> ' + this.state.count);
  }

  componentWillUnmount() {
    log('[class] componentWillUnmount');
  }

  handleClick = () => {
    this.setState({ count: this.state.count + 1 });
  };

  render() {
    return (
      <button id="class-btn" onClick={this.handleClick}>
        Class: {this.state.count}
      </button>
    );
  }
}

function CounterFunction() {
  const [count, setCount] = useState(0);

  useEffect(() => {
    log('[function] effect run, count = ' + count);
    return () => {
      log('[function] cleanup, count = ' + count);
    };
  }, [count]);

  return (
    <button id="fn-btn" onClick={() => setCount(count + 1)}>
      Function: {count}
    </button>
  );
}兩個按鈕在頁面上依序操作:點類別按鈕兩次、點函式按鈕一次,最後按「Unmount」把兩個元件移除。log 函式把訊息依序寫進頁面上的 <pre>:
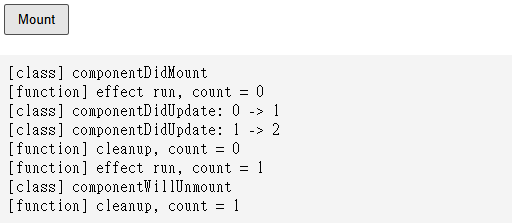
從圖中的順序可以對照:
- 初次渲染:類別印
componentDidMount,函式印effect run, count = 0。 - 點類別按鈕:每次
setState後印一行componentDidUpdate,帶出前後的count(0 -> 1、1 -> 2)。 - 點函式按鈕:先跑上一輪的
cleanup, count = 0,再跑新的effect run, count = 1。 - 按下 Unmount:類別印
componentWillUnmount,函式印最後一次的cleanup, count = 1。
這裡的重點是兩者「切分方式」不同:類別按時間點拆成三個方法,函式的 useEffect 則是把「設定」和「清除」寫在一起,並用依賴陣列決定何時重跑。官方的說法是:許多情況下,類別元件同時定義 componentDidMount、componentDidUpdate、componentWillUnmount,等同於在函式元件呼叫 useEffect;少數需要在瀏覽器繪製前執行的情況,useLayoutEffect 比較接近。官方也提醒:元件如果沒有和任何外部系統同步,可能根本不需要 Effect。
類別元件與函式元件對照
官方文件在 Component 頁面提供「從類別遷移到函式」的範例,對照起來是:
| 類別元件 | 函式元件 |
|---|---|
this.props | 函式參數 props |
this.state 與 this.setState | useState |
componentDidMount、componentDidUpdate、componentWillUnmount | useEffect(需要在繪製前執行時用 useLayoutEffect) |
static contextType 與 this.context | useContext |
同一個元件用兩種寫法渲染,輸出的 HTML 一樣。下面用 react-dom/server 的 renderToStaticMarkup 輸出:
class GreetingClass extends Component {
  state = { count: 0 };
  render() {
    return <h1>Hello, {this.props.name}! ({this.state.count})</h1>;
  }
}

function GreetingFunction({ name }) {
  const [count] = useState(0);
  return <h1>Hello, {name}! ({count})</h1>;
}

const a = renderToStaticMarkup(<GreetingClass name="Taylor" />);
const b = renderToStaticMarkup(<GreetingFunction name="Taylor" />);
console.log('class   :', a);
console.log('function:', b);
console.log('same HTML:', a === b);
差別不在輸出,而在寫法與可用的功能:函式元件不用處理 this、不用綁定方法,也能用 Hooks 把相關邏輯放在一起。官方文件的遷移範例也以「Typically, you will define components as functions instead」開頭,意思是一般會改用函式定義元件。
Error Boundary:目前仍需要類別元件的情況
官方文件指出,React 預設在渲染過程丟出錯誤時,會把整個 UI 從畫面移除。要避免這種情況,可以用 Error Boundary 包住一部分 UI:它是特殊的元件,子元件出錯時改顯示備用畫面(fallback UI)。
要實作 Error Boundary,官方要求提供 static getDerivedStateFromError,用來在出錯後更新 state,也可以選擇性實作 componentDidCatch 記錄錯誤。官方文件在這兩個方法下都註明:函式元件目前沒有直接對應,並且明講「目前沒有辦法用函式元件寫 Error Boundary」。所以這是類別元件目前還有不可取代用途的地方。
class ErrorBoundary extends Component {
  state = { hasError: false };

  static getDerivedStateFromError(error) {
    return { hasError: true };
  }

  componentDidCatch(error, info) {
    const el = document.getElementById('log');
    el.textContent = 'componentDidCatch: ' + error.message;
  }

  render() {
    if (this.state.hasError) {
      return <p id="fallback">Something went wrong.</p>;
    }
    return this.props.children;
  }
}

function Broken() {
  throw new Error('render failed');
}
把正常的子元件換成 Broken 之後,畫面變成備用內容,componentDidCatch 收到錯誤訊息:
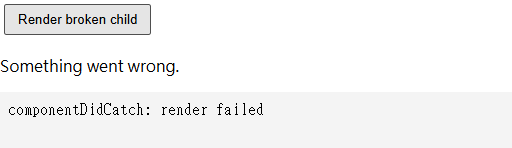
官方也列出 Error Boundary 不會捕捉的錯誤:事件處理器內的錯誤、伺服器端渲染(Server side rendering)、Error Boundary 自身丟出的錯誤,以及非同步程式碼(例如 setTimeout 或 requestAnimationFrame 的回呼)中的錯誤;startTransition 是例外,其中的錯誤會被捕捉。
舊的生命週期方法:componentWillMount 等已棄用
舊教學常見 componentWillMount、componentWillReceiveProps、componentWillUpdate。官方說明這三個 API 已改名為加上 UNSAFE_ 前綴的版本,舊名稱已棄用,未來的主要版本將只有新名稱可用;官方並提供 rename-unsafe-lifecycles codemod 協助自動更新。官方對 UNSAFE_componentWillMount 的說法是:它只因歷史原因而存在,不該用在任何新程式碼。看到舊專案有這些方法時,別直接模仿,改用上面表格的方法或函式寫法。
shouldComponentUpdate 與 PureComponent
類別元件可以定義 shouldComponentUpdate 決定是否略過重新渲染。官方說明這個方法只是效能最佳化,如果沒有它元件就會壞掉,應該先修那個問題;也建議考慮用 PureComponent,而不是手寫 shouldComponentUpdate。
static defaultProps:類別元件仍保留
類別元件可以用 static defaultProps 設定預設 props,官方說明它用於 undefined 與缺少的 props,不用於 null。React 19 升級指南提到:React 19 移除了函式元件的 defaultProps,改用 ES6 預設參數;類別元件因為沒有 ES6 替代方案,會繼續支援。TypeScript 專案與函式元件 defaultProps 的處理方式,可前往〈解決 React 元件 defaultProps 錯誤:TypeScript Props 預設參數、HOC 與重構踩坑排查〉觀看。
學 Class Component 還有用嗎?
整理官方文件的立場:
- 新元件:官方建議用函式,類別元件不建議用在新程式碼。
- 舊專案:類別元件仍受支援,不是非改不可;讀得懂
this.state、生命週期與setState,就能維護既有程式碼。 - 要寫 Error Boundary:目前仍要用類別。
- 要遷移:官方的做法是逐項對照,先確認
componentWillUnmount做的事和componentDidMount相反,再把這組邏輯改寫成一個 Effect。
要自己建立專案練習,可前往〈React 工具鏈規格解析:基於 Vite 的初始化流程、目錄架構與生產環境建構〉觀看。
Class Component 重點整理
| 項目 | 說明 |
|---|---|
| 定義 | 繼承 Component、實作 render() 的 JavaScript 類別 |
| props 與 state | this.props、this.state;改 state 用 setState,不可直接修改 |
| 生命週期 | componentDidMount、componentDidUpdate、componentWillUnmount 三個時間點 |
| 對應函式寫法 | useState、useEffect、useContext |
| 已棄用 | componentWillMount、componentWillReceiveProps、componentWillUpdate 舊名稱 |
| 仍需類別 | Error Boundary |
| 官方立場 | 仍支援,但新程式碼建議用函式元件 |






發佈留言